One major issue agencies encounter when switching hosting providers, updating email records, or making any DNS changes is DNS access.
This usually happens because DNS is controlled by the client and spread across different registrars. Even after a migration is complete, the site can remain offline while the agency waits for the client to log in, retrieve credentials, handle 2FA, or respond.
We’ve seen agencies complete hundreds of migrations, but only get a fraction of sites live because DNS updates are delayed. This costs your agency hours that could be spent on more important tasks.
The best way to avoid this is to manage DNS centrally. A simple and scalable option is Cloudflare. With Cloudflare’s free account, agencies can manage DNS for multiple client domains in one place, without needing registrar logins.
How to manage DNS centrally with Cloudflare
Managing DNS centrally with Cloudflare is a one-time setup for each client domain. For many agencies, this is easiest to do during onboarding a new client, but it can also be applied to existing sites at any time.
Step 1: Create a free Cloudflare account
Start by creating a Cloudflare account for your agency to manage DNS for all client domains. For DNS management, Cloudflare’s free plan is enough. You can add multiple client domains to the same account and manage them from one place.
Since this account is used across many client sites, it’s best to treat it as a shared agency account. Instead of sharing one login, invite team members to the account so DNS access is not tied to a single person. This also makes it easier to control who can make changes.
Step 2: Add a client domain to Cloudflare
From the Cloudflare dashboard, click + Add and select Connect a domain. Next, enter a domain name. This should be the client’s root domain, for example, clientsite.com, not a subdomain like www.clientsite.com.
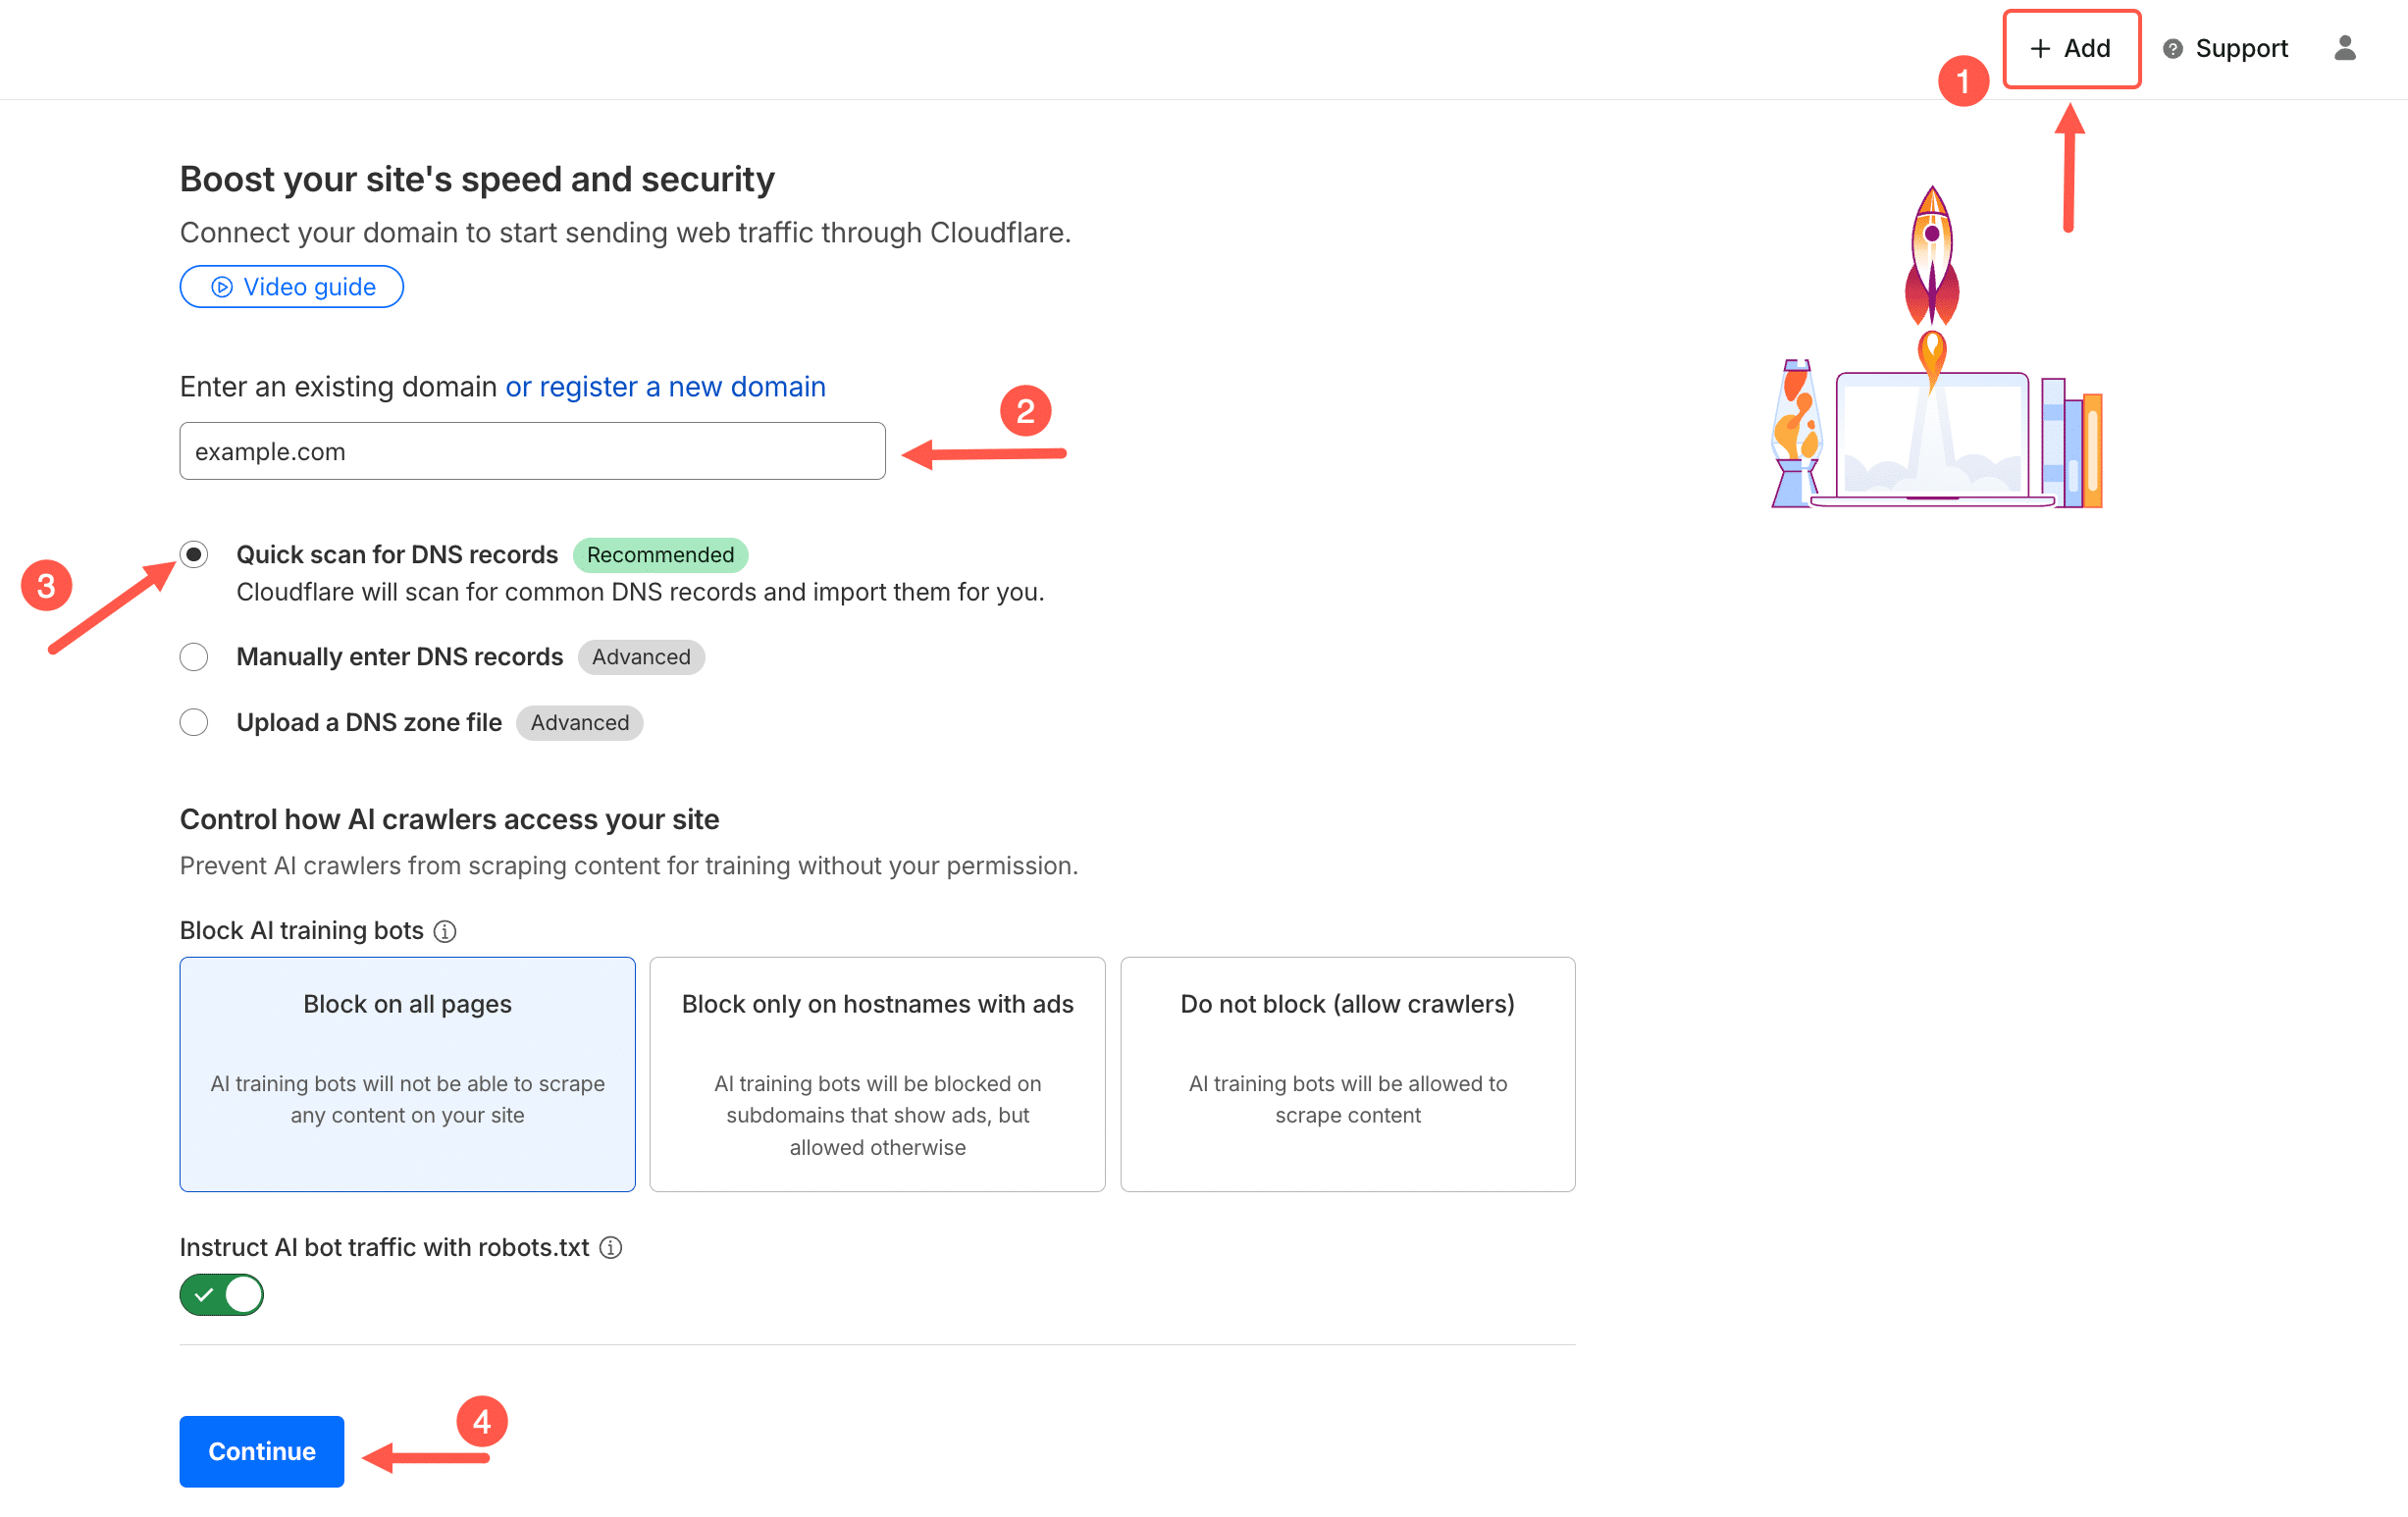
After entering the domain, click Continue. Cloudflare then asks you to choose a plan. For DNS management, the Free plan is sufficient.
Once the plan is selected, Cloudflare scans the domain and attempts to automatically import the existing DNS records. This usually includes the main website record, the www record, email-related records, and any other DNS entries already in use.

At this point, Cloudflare is not live yet. The domain is still using DNS at the registrar. Cloudflare is simply showing you the current DNS configuration so you can review it before making any changes.
Step 3: Point the domain to Kinsta using CNAME records
In the imported records, remove all existing A records and add a CNAME record for the root/apex domain, pointing to [sitename].hosting.kinsta.cloud.
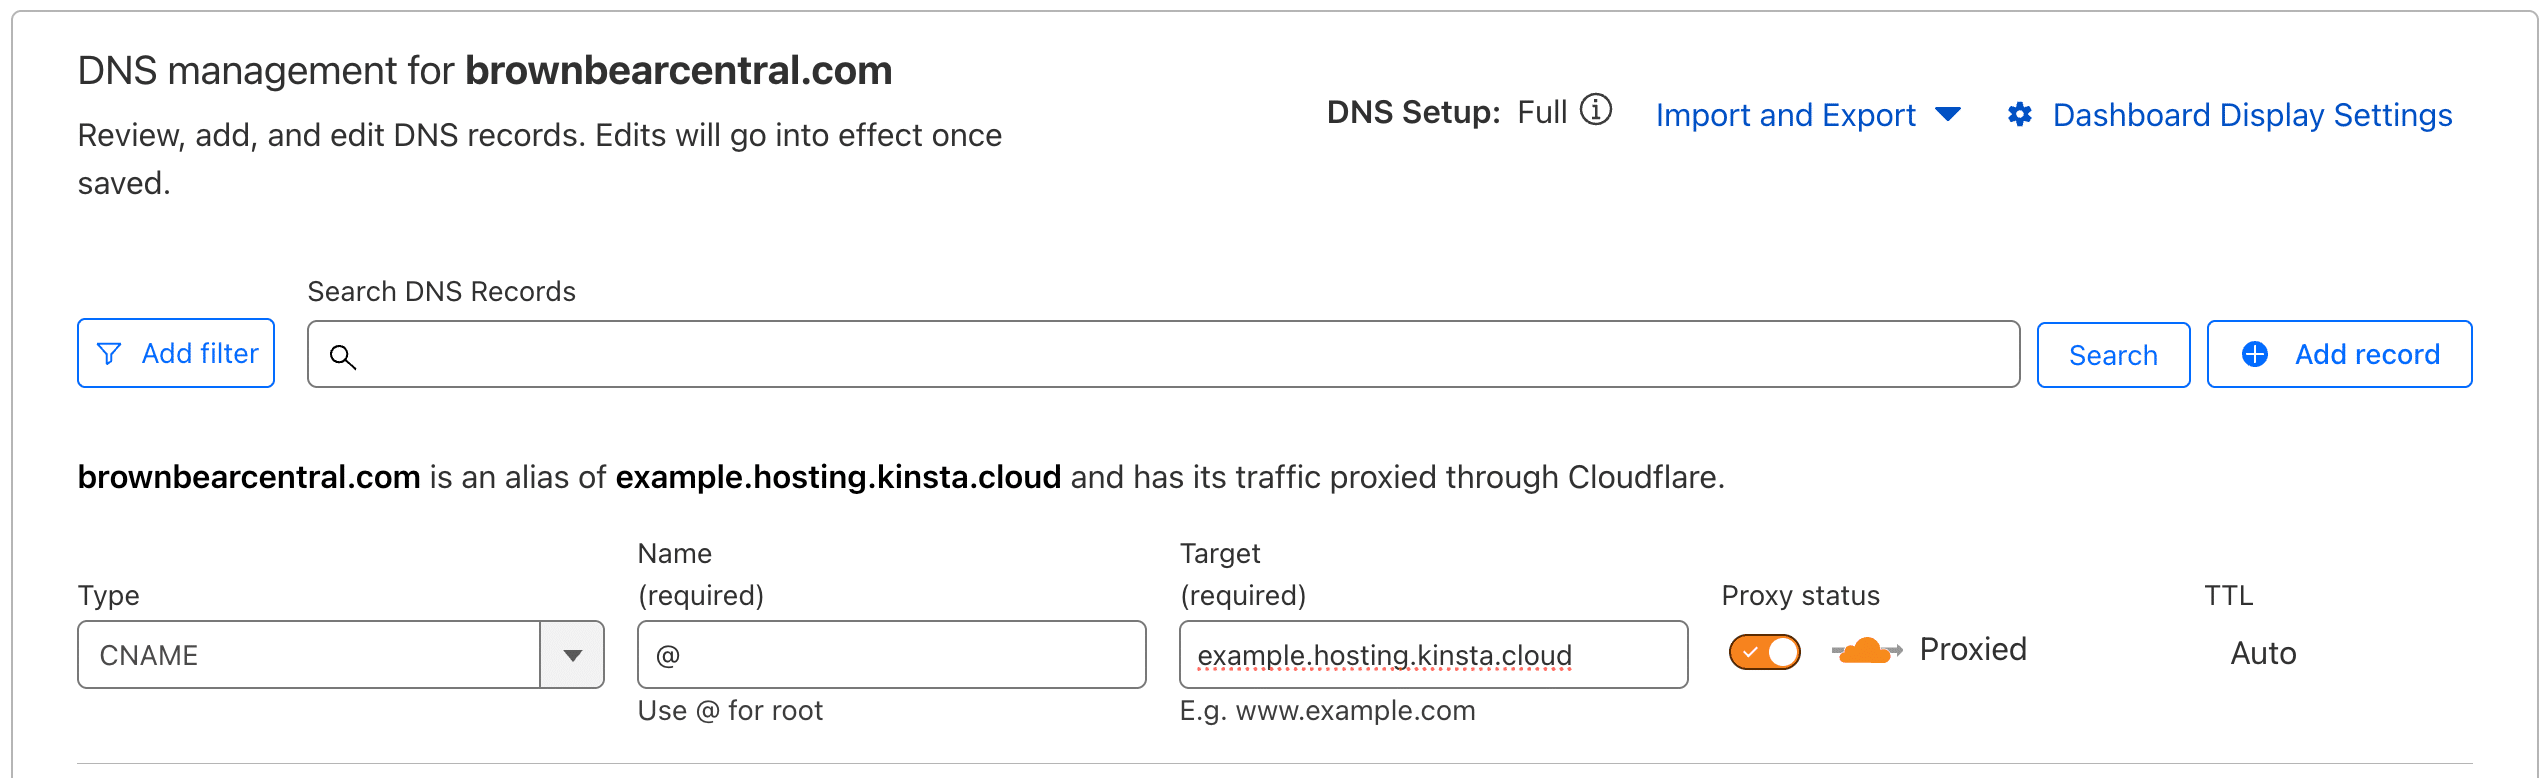
The [sitename] must be the Database name from the Database access section of your site’s Info page.

If the domain uses www, make sure there is also a CNAME record for www pointing to the same [sitename].hosting.kinsta.cloud address. You can find more details in our documentation.
Step 4: Update the domain’s nameservers to Cloudflare
Once the DNS records have been reviewed and updated, the next step is updating the domain’s nameservers. This is what moves DNS management from the registrar to Cloudflare.
Cloudflare detects the domain’s registrar and provides two nameservers to use for that domain.
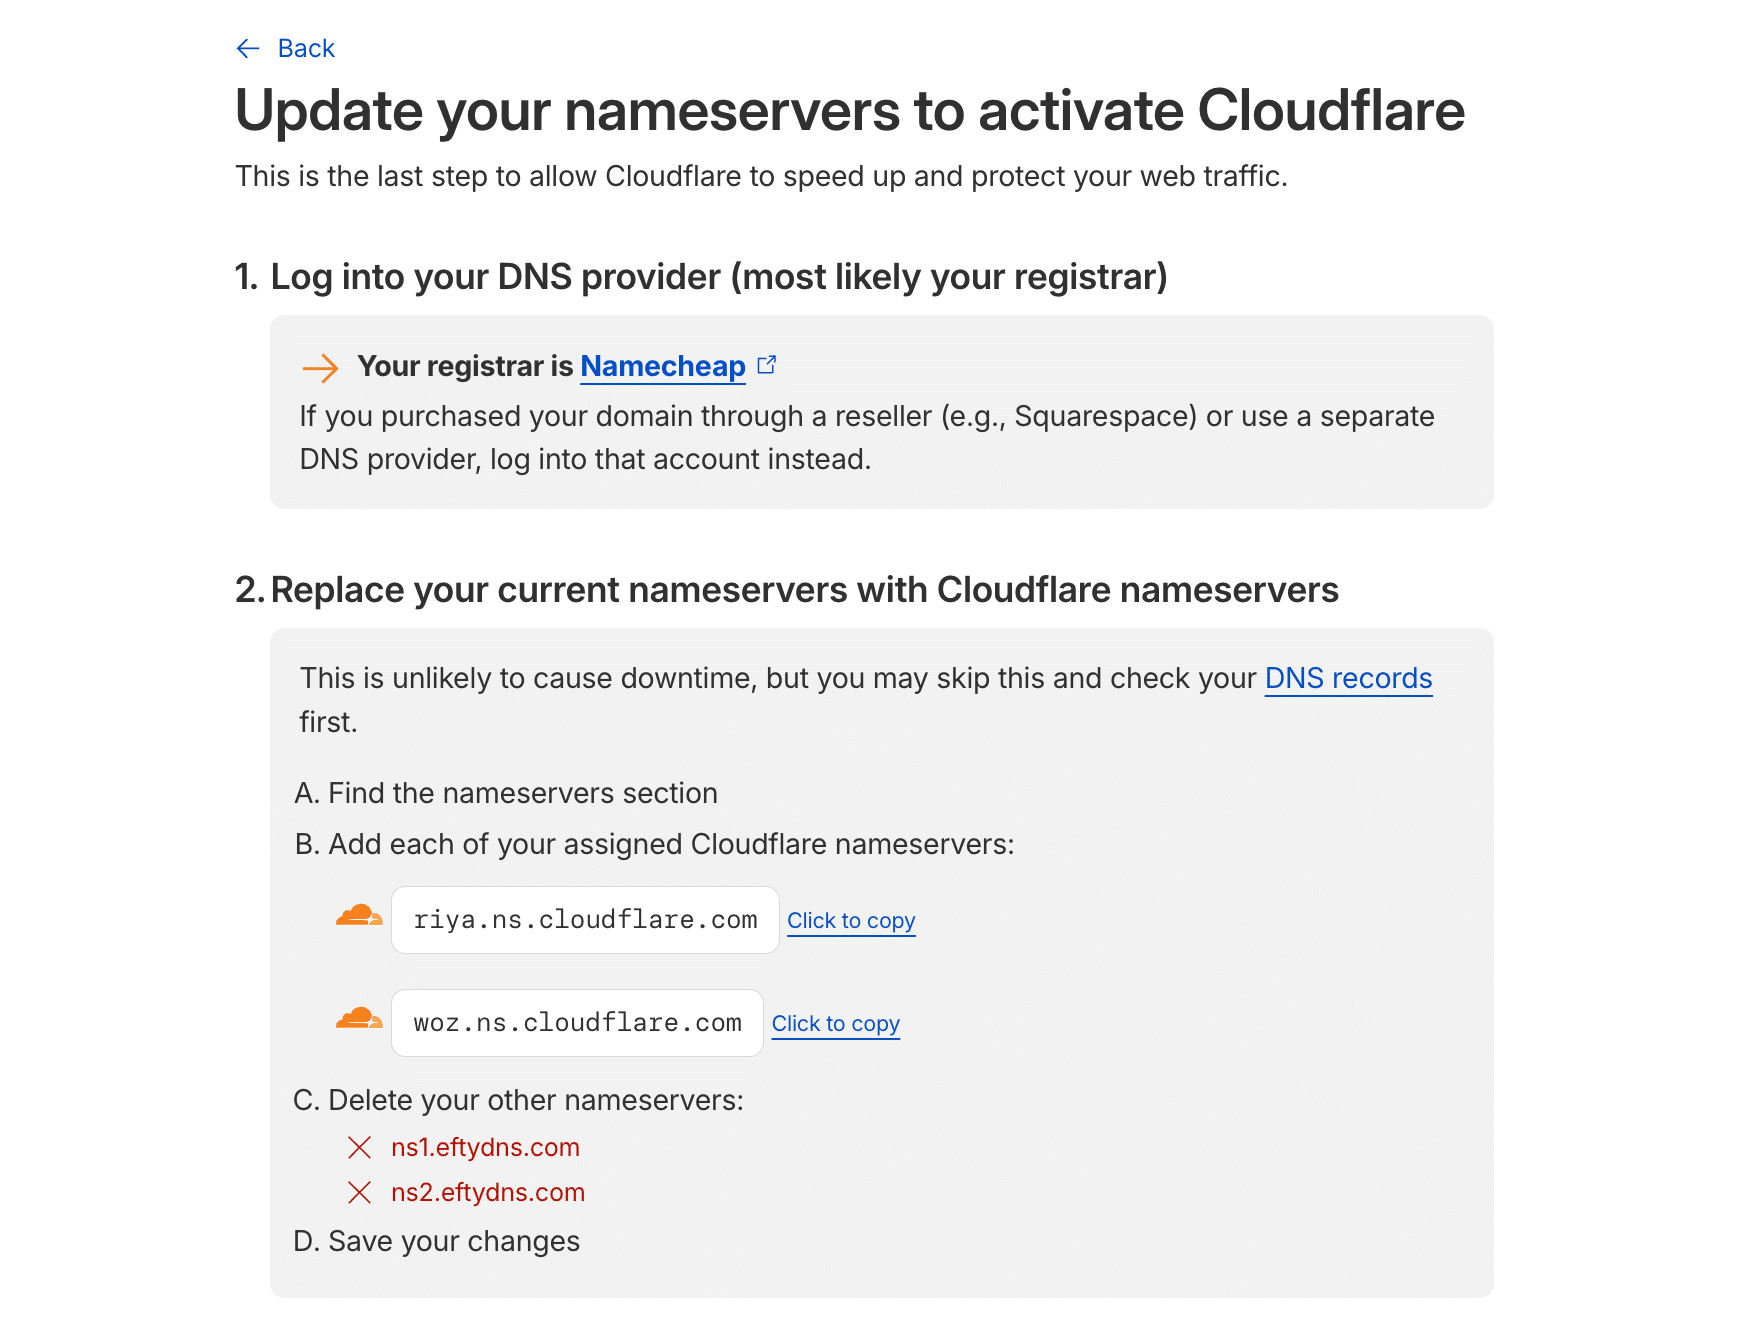
These nameservers need to replace the existing nameservers at the registrar where the domain is registered, such as GoDaddy, Namecheap, or Google Domains.
If the agency has access to the registrar, you can make this change directly. If not, you can send the client the two nameservers and ask them to update them on their side.
Step 5: Repeat this setup for each client domain
After the nameservers are updated, Cloudflare confirms when the domain becomes active. You can then repeat the same process for each of your client domains.
Over time, this allows agencies to manage DNS for all client sites from a single place, using the same workflow each time.
Why this setup works well for agencies
Centralizing DNS management makes a significant difference for agencies, especially as the number of client sites grows. Here are some reasons why this setup works so well.
- Removes DNS as a migration blocker: With DNS managed centrally, the agency can update records immediately when the site is ready, without waiting on client access or approvals.
- Makes hosting changes easier: Agencies can switch hosting providers when performance, reliability, or support no longer meet expectations.
- Avoids the need for registrar logins and client credentials: One of the biggest operational headaches for agencies is accessing registrar accounts. Credentials expire, 2FA gets in the way, and in many cases, the agency never had access in the first place. Once DNS is in Cloudflare, the agency no longer needs registrar logins for day-to-day DNS changes.
- Reduces client communication and confusion: Most clients do not want to deal with DNS. They also tend to ask questions when they hear things like “update your DNS” or “change your nameservers.” Managing DNS centrally reduces the need for client involvement and helps avoid unnecessary back-and-forth during migrations or provider changes.
- Gives agencies a single dashboard across multiple client domains: Instead of managing DNS across many registrars and different dashboards, agencies manage everything from one place.
- Works at scale without added cost: Cloudflare’s free plan supports DNS management for multiple domains. This makes it practical for agencies managing many client sites without introducing additional tooling or recurring costs.
A better DNS workflow for agencies
For agencies managing multiple client sites, DNS should not slow work or depend on client availability. Centralized DNS management enables a workflow in which migrations, hosting changes, and other updates can occur when ready, not when a client has time to log in.
This approach keeps domain ownership with the client, avoids the need for registrar access, and gives agencies a consistent way to manage DNS across all sites. As the number of client sites grows, this consistency becomes even more important.
If you need help setting this up or have questions about DNS configuration for your sites, our Support team is available to help.

Kinsta
Joel is a Frontend developer working at Kinsta as a Technical Editor. He is a passionate teacher with love for open source and has written over 300 technical articles majorly around JavaScript and it’s frameworks.